Monday, September 15, 2014

Sending POST/PUT requests, with JSON form body, in Node.js

Today one of my friends asked me to help him with sending a PUT request to a remote server, in Node.js. I started Googling and as usual I found this excellent Stackoverflow answer.
var http = require('http');

var options = {
host: 'localhost',
path: '/users/1',
port: 3000,
method: 'PUT'
};

var callback = function(response) {
var str = '';

//another chunk of data has been recieved, so append it to `str`
response.on('data', function(chunk) {
str += chunk;
});

//the whole response has been recieved, so we just print it out here
response.on('end', function() {
console.log(str);
});
};

http.request(options, callback).end();
This works well. It creates a HTTP PUT request, to the server hosted at localhost on port 3000 and in the path '/users/1'. Now the interesting part is, normally, when we send PUT/POST requests, we used to send parameters. These parameters will be represented normally as key-value pairs. It will be easy to represent them in JSON format. So, the above code just needs few more changes to send the request with a JSON body.
var http = require('http');

var bodyString = JSON.stringify({
    username: 'thefourtheye',
    password: '********'
});

var headers = {
    'Content-Type': 'application/json',
    'Content-Length': bodyString.length
};

var options = {
    host: 'localhost',
    path: '/users/1',
    port: 3000,
    method: 'PUT',
    headers: headers
};

// callback is same as in the above seen example.
...
...

http.request(options, callback).write(bodyString);
What we are actually doing here is, creating a JSON structure for the form body and then we are converting that to a valid JSON string. This is important, since we are sending the body as a JSON structure, it should conform to the JSON semantics. So, if you printed the bodyString, you would get something like this
{"username":"thefourtheye","password":"********"}
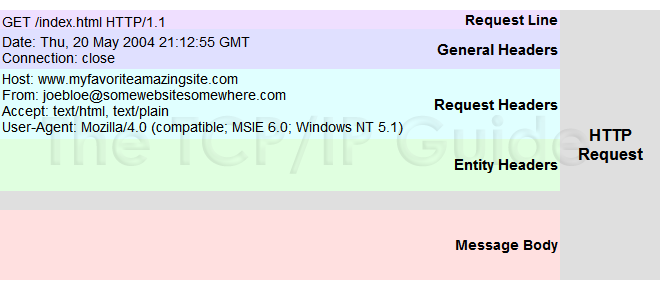
Now, we constructed the body string. But, how will we let the server know that the request is not over immediately after the HTTP Request line and the headers in the HTTP Request.

Source: http://www.tcpipguide.com/free/t_HTTPRequestMessageFormat.htm


As we see in the picture, after the headers section, there is the body section, which is where the body string we generated will be put in. But how will the web-server know the format of the body section and where it actually ends? That is why we put in two 'headers' in the 'options' object.
var headers = {
    'Content-Type': 'application/json',
    'Content-Length': bodyString.length
};

Here we specify the type of the body and the actual length of it. Okay, now that we specified the type and the length, how are we going to send the string? We simply write it to the 'ClientRequest' object returned by the 'http.request', like this
http.request(options, callback).write(bodyString);
That is it :-)

Saturday, March 1, 2014

Node.js - modules and exports

I think most of us haven't understood the concept of modules in Node.js properly. Let us discuss the basics of that in this post.

Module System

In Node.js, when you create a new JavaScript file, that will be considered as a separate module. Inside that module, you can access the module itself with module object. You can check that, like this

console.log(module);
which produces something like this
{ id: '.',
  exports: {},
  parent: null,
  filename: '/home/thefourtheye/Desktop/Test.js',
  loaded: false,
  children: [],
  paths:
   [ '/home/thefourtheye/Desktop/node_modules',
     '/home/thefourtheye/node_modules',
     '/home/node_modules',
     '/node_modules' ] }

exports and module.exports

As you can see, it is just a plain JavaScript object. The important thing to be noted here is, the exports object in module. In every module, JavaScript, by default, offers another variable called exports. That is nothing but the same object in module object of the same name. You can check that like this

exports.jabberwocky = "blah blah blah";
console.log(module.exports);            // { jabberwocky: 'blah blah blah' }

So, they are one and the same. But, when some other module requires this module, the object returned will be module.exports only. As long as you are augmenting module.exports and exports, there will be no problem. But when you assign something to either exports or module.exports, they no longer refer to the same object.

exports = {"king": "Sourav Ganguly"};
console.log(module.exports);           // {}
console.log(exports);                  // { king: 'Sourav Ganguly' }

You are making both exports and module.exports refer to different objects. So, when this module is exported, an empty object will be exported (remember, only module.exports will be exported when required from other files), even though we assigned a valid object to exports. So, care should be taken when you replace either of those objects. That is the reason why we often see something like this

exports = module.exports = ...

Scope

All the variables and functions declared within the module will be accessible only inside the module (as long as they are created with var keyword). Quoting from the modules documentation

Variables local to the module will be private, as though the module was wrapped in a function.
Happy modularizing the code :)

Tuesday, January 28, 2014

Bad UI Design - Twitter Account page

I am going to consider this as a bug in Twitter. When I wanted to change my profile information (in Chrome 32, Ubuntu 13.04), I don't see a save or update button. Highly frustrating. Hope they fix it soon.

Sunday, January 5, 2014

Un-hiding Menu Bar in Sublime Text 3 - Ubuntu

Edit on 13-Jan-2016
I found another easy way to fix this problem. You can toggle the menu with a keyboard shortcut. You can read more about that in this blog post of mine.


It has been a very long wait to get the "Hide Menu" feature in Linux versions of Sublime Text 3. Finally it was released. But the problem is, if it hidden once, there is no straight forward way to get the Menu back. I tried F10, Alt etc etc and nothing worked. So, I am sharing the trick which worked for me in this post.

It is simple. Close the Sublime Text 3, if it is open. Open

~/.config/sublime-text-3/Local/Session.sublime_session
in any of your favorite editors and then make sure that, "menu_visible" is "true" in all places in that file.
"menu_visible": true,
Thats it :) Open Sublime Text 3 now and ta-da... Menu is back :)


Edit On Jan 10 - 2016

As I was doing the same task more often, I decided that put that in a script, like this

export FILE=/home/thefourtheye/.config/sublime-text-3/Local/Session.sublime_session
export TEMP_FILE=/home/thefourtheye/.config/sublime-text-3/Local/Session.sublime_session.bkp
sed -e 's/"menu_visible": false/"menu_visible": true/g' $FILE > $TEMP_FILE
mv $TEMP_FILE FILE
and then I added that to my shell script's rc file as an alias like this
alias sublime_fix_menu=~/.sublime_fix_menu.zsh
That's it :-) Now, I just have to close Sublime Text 3, type sublime_fix_menu in the shell, open Sublime again :-)

Sunday, November 17, 2013

Python Dictionary Comprehension

Dictionary comprehensions were backported from Python 3.x to 2.7. I always have believed that they are very pythonic and functional way of programming. Whenever comprehension is used, mutation of mutable elements (set, dict, list etc) becomes unnecessary and that definitely improves the performance as well. Lets start with a simple dictionary comprehension

>>> myMatrix = [[1, 100], [2, 200], [3, 300]]
>>> {key:value for key, value in myMatrix}
{1: 100, 2: 200, 3: 300}

Here we use unpacking from myMatrix list and we have used {} with key:value notation. This way, we can easily convert a list of lists to a dictionary with dictionary comprehension. Lets look at a complicated example

>>> myMatrix = [[100, 100], [20, 200], [30, 300]]
>>> {(key + 100 if key < 100 else key):(value/10 if value >= 200 else value/5) for key, value in myMatrix}
{120: 20, 130: 30, 100: 20}

Here we use conditional expressions to dynamically decide what the key and the value are going to be.

Performance

>>> def changeDict():
...     newDict = {}
...     for key, value in myMatrix:
...         newDict[(key + 100 if key < 100 else key)] = value/10 if value >= 200 else value/5
...     return newDict
...     
>>> from timeit import timeit
>>> timeit("{(key + 100 if key < 100 else key):(value/10 if value >= 200 else value/5) for key, value in myMatrix}", setup="from __main__ import myMatrix")
0.7076609134674072
>>> timeit("changeDict()", setup="from __main__ import myMatrix, changeDict")
0.7484149932861328

The use of comprehension is slightly faster than the function which adds keys and values to an existing dictionary. This difference will be significant when the myMatrix has huge amount of data.