Sunday, March 6, 2016

DSL-2730U router's ipv6 problem in Ubuntu

Today I faced a very strange problem. I got a new Tata DOCOMO connection and I wanted to fetch upstream changes from a GitHub repository, with git fetch --all. But all I got was
fatal: unable to access 'https://github.com/<repo>': Failed to connect to github.com port 443: Network is unreachable
I thought that the internet connection has a problem. But then I was able to ping github.com and access that site in my browser, although curl still failed.
➜  io.js git:(master) ✗ curl https://github.com
curl: (7) Failed to connect to github.com port 443: Network is unreachable
At this point I became curious and tried out the verbose curl,
➜  io.js git:(master) ✗ curl -v https://github.com
* Rebuilt URL to: https://github.com/
* Hostname was NOT found in DNS cache
*   Trying 192.30.252.128...
*   Trying 64:ff9b::c01e:fc81...
* connect to 64:ff9b::c01e:fc81 port 443 failed: Network is unreachable
* Failed to connect to github.com port 443: Network is unreachable
* Closing connection 0
curl: (7) Failed to connect to github.com port 443: Network is unreachable
Now, it figures out both the IPv4 address and the IPv6 address but favors IPv6 over IPv4. And it looks like, either the modem or the ISP don't support IPv6 based communication. I don't know how to confirm what the actual problem is. I tried to upgrade the firmware of my DSL-2730U router, by logging into 192.168.1.1. But it kept failing, saying the the firmware image file is too big.

So, I decided to disable IPv6 in my Ubuntu machine and I followed the instructions given here and it worked perfectly. Basically, I edited /etc/sysctl.conf file to include the following lines
# disable IPv6 on this machine
net.ipv6.conf.all.disable_ipv6 = 1
net.ipv6.conf.default.disable_ipv6 = 1
net.ipv6.conf.lo.disable_ipv6 = 1
and then executed sudo sysctl --system and sudo sysctl -p.

Wednesday, February 3, 2016

Sane ECMAScript 6 Generators

This post is cross posted in Medium, here.

I recently found one interesting thing about ES6 Generators. I come from Python background and I understood generators as in Python. So, I expected the following Python code's equivalent ECMAScript 6 code also to work as well.
>>> numbers = (num for num in range(10))
>>> for num in numbers:
...   if num == 3:
...     break
... 
>>> next(numbers)
4
You can find the online demo for this Python program, here.

But then, when I used Babel to transpile the following code and executed it
function* NumberGenerator() {
  for (var i = 0; i < 10; i += 1) {
    yield i;
  }
}

var numbers = NumberGenerator();

for (var num of numbers) {
  if (num === 3) {
    break;
  }
}

console.log(numbers.next());
// {"done":true}
You can find the online demo for this JavaScript program, made with Babel's REPL, here. As you see here, when I broke out of the loop, the Generator Object got closed. This was pointed out to me by Logan Smyth in Babel's Slack discussion. I was really surprised by this behavior and found the 13.7.5.13 Runtime Semantics: ForIn/OfBodyEvaluation ( lhs, stmt, iterator, lhsKind, labelSet ) section in the ECMAScript 6 Specification, which says
If LoopContinues(result, labelSet) is false, return IteratorClose(iterator, UpdateEmpty(result, V)).
I am not sure about the rationale behind that decision, but I am convinced that it would effectively limit the potential of the Generators. So I decided to fix this.

Sane Generators

To close the iterator, Iterator.prototype.return is called. (At the time of this writing, not many JavaScript Engines support this function. You can find the support for this feature by popular engines, here.) So I decided to override that and allow the actual return function to be invoked only when explicitly called with an argument.
function returnFunction(originalReturn, genObject) {
  return function(arg) {
    return arguments.length ? originalReturn.call(genObject, arg) : {
      done: false
    };
  };
}

function SaneGenerator(genObject) {
  var originalReturn = genObject['return'];

  if (typeof originalReturn === 'function') {
    Object.defineProperty(genObject, 'return', {
      value: returnFunction(originalReturn, genObject)
    });
  }

  return genObject;
}
You can see the actual and complete implementation in my GitHub repository, https://github.com/thefourtheye/sane-generator. Now, you can use the SaneGenerator like this
function* NumberGenerator() {
  for (var i = 0; i < 10; i += 1) {
    yield i;
  }
}

var numbers = SaneGenerator(NumberGenerator());

for (var num of numbers) {
  if (num === 3) {
    break;
  }
}

console.log(numbers.next());
// {"value":4,"done":false}
You can find the online demo for this JavaScript program, made with Babel's REPL, here.

NPM Module

This is available as an NPM module now. https://www.npmjs.com/package/sane-generator

Sunday, January 10, 2016

Sublime Text 3 unhiding menu in Ubuntu - simpler solution

The method which I mentioned in this blog post of mine, solves the problem, but then you have to
  1. Close the Sublime Text
  2. Fire up a terminal
  3. Execute a command or two
  4. Open Sublime Text again
Quite a lot of steps to do. But then I found a simpler solution today and it works like a charm for me. The solution is to use "Keyboard Shortcuts" :-) Let me explain in detail.
  1. Click Preferences -> Key Bindings - User
  2. In the window that opens, you need to add a new keyboard shortcut for the command "toggle_menu". For example, this is how my shortcuts looks like
    [{"keys": ["ctrl+\\"], "command": "toggle_side_bar"},
     {"keys": ["ctrl+shift+m"], "command": "toggle_menu"}]
  3. Save the file and start doing your happy dance.
Now, you can simply press the keyboard shortcut whatever you choose to assign to toggle menu :-)

Sunday, February 15, 2015

Python 3.5 and Django 1.7's HTMLParseError

I just updated my Python installation to 3.5 Alpha 1 and started with Django today and I hit a road block already. It all went fine, when I created the virtual environment and installed Django 1.7.4 in it. And then when I did startproject, I got AttributeError: module 'html.parser' has no attribute 'HTMLParseError'.
(py3.5venv) ➜  myProject git:(master) ✗ django-admin.py startproject myProject
Traceback (most recent call last):
  File "/py3.5venv/bin/django-admin.py", line 5, in 
    management.execute_from_command_line()
  File "/py3.5venv/lib/python3.5/site-packages/django/core/management/__init__.py", line 385, in execute_from_command_line
    utility.execute()
  File "/py3.5venv/lib/python3.5/site-packages/django/core/management/__init__.py", line 354, in execute
    django.setup()
  File "/py3.5venv/lib/python3.5/site-packages/django/__init__.py", line 18, in setup
    from django.utils.log import configure_logging
  File "/py3.5venv/lib/python3.5/site-packages/django/utils/log.py", line 13, in 
    from django.views.debug import ExceptionReporter, get_exception_reporter_filter
  File "/py3.5venv/lib/python3.5/site-packages/django/views/debug.py", line 10, in 
    from django.http import (HttpResponse, HttpResponseServerError,
  File "/py3.5venv/lib/python3.5/site-packages/django/http/__init__.py", line 4, in 
    from django.http.response import (
  File "/py3.5venv/lib/python3.5/site-packages/django/http/response.py", line 13, in 
    from django.core.serializers.json import DjangoJSONEncoder
  File "/py3.5venv/lib/python3.5/site-packages/django/core/serializers/__init__.py", line 23, in 
    from django.core.serializers.base import SerializerDoesNotExist
  File "/py3.5venv/lib/python3.5/site-packages/django/core/serializers/base.py", line 6, in 
    from django.db import models
  File "/py3.5venv/lib/python3.5/site-packages/django/db/models/__init__.py", line 6, in 
    from django.db.models.query import Q, QuerySet, Prefetch  # NOQA
  File "/py3.5venv/lib/python3.5/site-packages/django/db/models/query.py", line 13, in 
    from django.db.models.fields import AutoField, Empty
  File "/py3.5venv/lib/python3.5/site-packages/django/db/models/fields/__init__.py", line 18, in 
    from django import forms
  File "/py3.5venv/lib/python3.5/site-packages/django/forms/__init__.py", line 6, in 
    from django.forms.fields import *  # NOQA
  File "/py3.5venv/lib/python3.5/site-packages/django/forms/fields.py", line 18, in 
    from django.forms.utils import from_current_timezone, to_current_timezone
  File "/py3.5venv/lib/python3.5/site-packages/django/forms/utils.py", line 15, in 
    from django.utils.html import format_html, format_html_join, escape
  File "/py3.5venv/lib/python3.5/site-packages/django/utils/html.py", line 16, in 
    from .html_parser import HTMLParser, HTMLParseError
  File "/py3.5venv/lib/python3.5/site-packages/django/utils/html_parser.py", line 12, in 
    HTMLParseError = _html_parser.HTMLParseError
AttributeError: module 'html.parser' has no attribute 'HTMLParseError'
Then Antti Haapala (a friend from Stakoverflow's Python Chat room) found out that it is because HTMLParseError is deprecated from Python 3.3 onwards and removed in Python 3.5, as per the official documentation. He continued the investigation and found out that django guys are already aware of this, as they have a bug raised, and the fix has been already delivered to the code repository.
Now, all we can do is, wait for the version of django which officially supports Python 3.5 or manually patch html_parser.py file as per the above shown fix. Even if we patch it manually, there is no guarantee that everything else will work fine.

Sunday, February 1, 2015

Ubuntu overlapping displays while scaling dual monitor setup

Today, again I wanted to change my screen's display size, in my Ubuntu 14.04. This time I have a dual monitor setup and I tried all the commands I mentioned in my blog post Ubuntu scaling the display (Zooming).
➜  ~  xrandr
Screen 0: minimum 8 x 8, current 2560 x 1024, maximum 16384 x 16384
VGA-0 connected 1280x1024+1280+0 (normal left inverted right x axis y axis) 376mm x 301mm
    1280x1024      60.0*+   75.0  
    1152x864       75.0  
    1024x768       75.0     60.0  
    800x600        75.0     60.3  
    640x480        75.0     59.9  
LVDS-0 connected (normal left inverted right x axis y axis)
    1600x900       60.0 +   40.0  
DP-0 connected primary 1280x1024+0+0 (normal left inverted right x axis y axis) 376mm x 301mm
    1280x1024      60.0*+   75.0  
    1152x864       75.0  
    1024x768       75.0     60.0  
    800x600        75.0     60.3  
    640x480        75.0     59.9  
DP-1 disconnected (normal left inverted right x axis y axis)
HDMI-0 disconnected (normal left inverted right x axis y axis)
DP-2 disconnected (normal left inverted right x axis y axis)
DP-3 disconnected (normal left inverted right x axis y axis)
➜  ~  xrandr --output DP-0 --scale 1.25x1.25
➜  ~  xrandr --output VGA-0 --scale 1.25x1.25
➜  ~  xrandr
Screen 0: minimum 8 x 8, current 2880 x 1280, maximum 16384 x 16384
VGA-0 connected 1600x1280+1280+0 (normal left inverted right x axis y axis) 376mm x 301mm
    1280x1024      60.0*+   75.0  
    1152x864       75.0  
    1024x768       75.0     60.0  
    800x600        75.0     60.3  
    640x480        75.0     59.9  
LVDS-0 connected (normal left inverted right x axis y axis)
    1600x900       60.0 +   40.0  
DP-0 connected primary 1600x1280+0+0 (normal left inverted right x axis y axis) 376mm x 301mm
    1280x1024      60.0*+   75.0  
    1152x864       75.0  
    1024x768       75.0     60.0  
    800x600        75.0     60.3  
    640x480        75.0     59.9  
DP-1 disconnected (normal left inverted right x axis y axis)
HDMI-0 disconnected (normal left inverted right x axis y axis)
DP-2 disconnected (normal left inverted right x axis y axis)
DP-3 disconnected (normal left inverted right x axis y axis)
Though it changes the display size, both the screens had overlapping images. After so much analysis, I found one inconsistency in the output of xrandr, before and after scaling. Note the first two lines.
Screen 0: minimum 8 x 8, current 2560 x 1024, maximum 16384 x 16384
VGA-0 connected 1280x1024+1280+0 (normal left inverted right x axis y axis) 376mm x 301mm
...
Screen 0: minimum 8 x 8, current 2880 x 1280, maximum 16384 x 16384
VGA-0 connected 1600x1280+1280+0 (normal left inverted right x axis y axis) 376mm x 301mm
Individual screen's resolution has scaled to 1600x1280 from 1280x1024, but the total screen size is 2880 x 1280, also the screen's position is 1280x0 instead of 1600x0. So, to get over the overlapping problem, I used the following command, after reboot, and it worked
➜  ~  xrandr --output DP-0 --scale 1.25x1.25 --pos 0x0 --output VGA-0 --scale 1.25x1.25 --pos 1600x0
➜  ~  xrandr
Screen 0: minimum 8 x 8, current 3200 x 1280, maximum 16384 x 16384
VGA-0 connected 1600x1280+1600+0 (normal left inverted right x axis y axis) 376mm x 301mm
    1280x1024      60.0*+   75.0  
    1152x864       75.0  
    1024x768       75.0     60.0  
    800x600        75.0     60.3  
    640x480        75.0     59.9  
LVDS-0 connected (normal left inverted right x axis y axis)
    1600x900       60.0 +   40.0  
DP-0 connected primary 1600x1280+0+0 (normal left inverted right x axis y axis) 376mm x 301mm
    1280x1024      60.0*+   75.0  
    1152x864       75.0  
    1024x768       75.0     60.0  
    800x600        75.0     60.3  
    640x480        75.0     59.9  
DP-1 disconnected (normal left inverted right x axis y axis)
HDMI-0 disconnected (normal left inverted right x axis y axis)
DP-2 disconnected (normal left inverted right x axis y axis)
DP-3 disconnected (normal left inverted right x axis y axis)
Now, you see that both the actual size of the screen and the starting position of the second screen is set properly.
Screen 0: minimum 8 x 8, current 3200 x 1280, maximum 16384 x 16384
VGA-0 connected 1600x1280+1600+0 (normal left inverted right x axis y axis) 376mm x 301mm
...

Tuesday, December 30, 2014

Python's venv problem with ensurepip in Ubuntu

Ubuntu 14.04's Python 3.4 installation has a problem with ensurepip module, as described in this bug. So if you follow the steps mentioned in the official documentation, you would see an error message like this
➜  Python  python3 -m venv py3.4venv
Error: Command '['/home/thefourtheye//py34venv/bin/python3', '-Im', 'ensurepip', '--upgrade', '--default-pip']' returned non-zero exit status 1
To resolve this problem, first install the venv, without pip, like this
python3 -m venv py3.4venv --without-pip
And then if you install pip, like this, it will still fail
(py3.4venv) ➜  py3.4venv  python -m ensurepip --upgrade
/home/thefourtheye/Python/py3.4venv/bin/python: No module named ensurepip
(py3.4venv) ➜  py3.4venv  python
Python 3.4.0 (default, Apr 11 2014, 13:05:11)
[GCC 4.8.2] on linux
Type "help", "copyright", "credits" or "license" for more information.
...
So, you need to install, pip separately, like mentioned in the pip's official documentation. So, the actual list of steps go like this
➜  Python  python3 -m venv py3.4venv --without-pip 
➜  Python  cd py3.4venv 
➜  py3.4venv  source bin/activate
(py3.4venv) ➜  py3.4venv  wget https://bootstrap.pypa.io/get-pip.py
--2014-12-30 14:35:34--  https://bootstrap.pypa.io/get-pip.py
Resolving bootstrap.pypa.io (bootstrap.pypa.io)... 103.245.222.175
Connecting to bootstrap.pypa.io (bootstrap.pypa.io)|103.245.222.175|:443... connected.
HTTP request sent, awaiting response... 200 OK
Length: 1581355 (1.5M) [text/x-python]
Saving to: ‘get-pip.py’

100%[=====================================================================================================================>] 15,81,355    129KB/s   in 8.9s   

2014-12-30 14:35:43 (173 KB/s) - ‘get-pip.py’ saved [1581355/1581355]

(py3.4venv) ➜  py3.4venv  python get-pip.py 
Collecting pip
  Downloading pip-6.0.3-py2.py3-none-any.whl (1.3MB)
    100% |################################| 1.3MB 139kB/s 
Collecting setuptools
  Downloading setuptools-9.1-py2.py3-none-any.whl (552kB)
    100% |################################| 552kB 180kB/s 
Installing collected packages: setuptools, pip


Successfully installed pip-6.0.3 setuptools-9.1
(py3.4venv) ➜  py3.4venv  deactivate 
➜  py3.4venv  source bin/activate                      
(py3.4venv) ➜  py3.4venv  pip install django
Collecting django
  Using cached Django-1.7.1-py2.py3-none-any.whl
Installing collected packages: django

Successfully installed django-1.7.1
(py3.4venv) ➜  py3.4venv  which pip
/home/thefourtheye/Python/py3.4venv/bin/pip
(py3.4venv) ➜  py3.4venv  

Monday, September 15, 2014

Sending POST/PUT requests, with JSON form body, in Node.js

Today one of my friends asked me to help him with sending a PUT request to a remote server, in Node.js. I started Googling and as usual I found this excellent Stackoverflow answer.
var http = require('http');

var options = {
host: 'localhost',
path: '/users/1',
port: 3000,
method: 'PUT'
};

var callback = function(response) {
var str = '';

//another chunk of data has been recieved, so append it to `str`
response.on('data', function(chunk) {
str += chunk;
});

//the whole response has been recieved, so we just print it out here
response.on('end', function() {
console.log(str);
});
};

http.request(options, callback).end();
This works well. It creates a HTTP PUT request, to the server hosted at localhost on port 3000 and in the path '/users/1'. Now the interesting part is, normally, when we send PUT/POST requests, we used to send parameters. These parameters will be represented normally as key-value pairs. It will be easy to represent them in JSON format. So, the above code just needs few more changes to send the request with a JSON body.
var http = require('http');

var bodyString = JSON.stringify({
    username: 'thefourtheye',
    password: '********'
});

var headers = {
    'Content-Type': 'application/json',
    'Content-Length': bodyString.length
};

var options = {
    host: 'localhost',
    path: '/users/1',
    port: 3000,
    method: 'PUT',
    headers: headers
};

// callback is same as in the above seen example.
...
...

http.request(options, callback).write(bodyString);
What we are actually doing here is, creating a JSON structure for the form body and then we are converting that to a valid JSON string. This is important, since we are sending the body as a JSON structure, it should conform to the JSON semantics. So, if you printed the bodyString, you would get something like this
{"username":"thefourtheye","password":"********"}
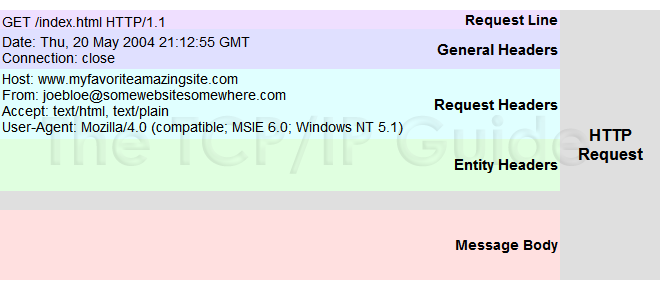
Now, we constructed the body string. But, how will we let the server know that the request is not over immediately after the HTTP Request line and the headers in the HTTP Request.

Source: http://www.tcpipguide.com/free/t_HTTPRequestMessageFormat.htm


As we see in the picture, after the headers section, there is the body section, which is where the body string we generated will be put in. But how will the web-server know the format of the body section and where it actually ends? That is why we put in two 'headers' in the 'options' object.
var headers = {
    'Content-Type': 'application/json',
    'Content-Length': bodyString.length
};

Here we specify the type of the body and the actual length of it. Okay, now that we specified the type and the length, how are we going to send the string? We simply write it to the 'ClientRequest' object returned by the 'http.request', like this
http.request(options, callback).write(bodyString);
That is it :-)

Saturday, March 1, 2014

Node.js - modules and exports

I think most of us haven't understood the concept of modules in Node.js properly. Let us discuss the basics of that in this post.

Module System

In Node.js, when you create a new JavaScript file, that will be considered as a separate module. Inside that module, you can access the module itself with module object. You can check that, like this

console.log(module);
which produces something like this
{ id: '.',
  exports: {},
  parent: null,
  filename: '/home/thefourtheye/Desktop/Test.js',
  loaded: false,
  children: [],
  paths:
   [ '/home/thefourtheye/Desktop/node_modules',
     '/home/thefourtheye/node_modules',
     '/home/node_modules',
     '/node_modules' ] }

exports and module.exports

As you can see, it is just a plain JavaScript object. The important thing to be noted here is, the exports object in module. In every module, JavaScript, by default, offers another variable called exports. That is nothing but the same object in module object of the same name. You can check that like this

exports.jabberwocky = "blah blah blah";
console.log(module.exports);            // { jabberwocky: 'blah blah blah' }

So, they are one and the same. But, when some other module requires this module, the object returned will be module.exports only. As long as you are augmenting module.exports and exports, there will be no problem. But when you assign something to either exports or module.exports, they no longer refer to the same object.

exports = {"king": "Sourav Ganguly"};
console.log(module.exports);           // {}
console.log(exports);                  // { king: 'Sourav Ganguly' }

You are making both exports and module.exports refer to different objects. So, when this module is exported, an empty object will be exported (remember, only module.exports will be exported when required from other files), even though we assigned a valid object to exports. So, care should be taken when you replace either of those objects. That is the reason why we often see something like this

exports = module.exports = ...

Scope

All the variables and functions declared within the module will be accessible only inside the module (as long as they are created with var keyword). Quoting from the modules documentation

Variables local to the module will be private, as though the module was wrapped in a function.
Happy modularizing the code :)

Tuesday, January 28, 2014

Bad UI Design - Twitter Account page

I am going to consider this as a bug in Twitter. When I wanted to change my profile information (in Chrome 32, Ubuntu 13.04), I don't see a save or update button. Highly frustrating. Hope they fix it soon.

Sunday, January 5, 2014

Un-hiding Menu Bar in Sublime Text 3 - Ubuntu

Edit on 13-Jan-2016
I found another easy way to fix this problem. You can toggle the menu with a keyboard shortcut. You can read more about that in this blog post of mine.


It has been a very long wait to get the "Hide Menu" feature in Linux versions of Sublime Text 3. Finally it was released. But the problem is, if it hidden once, there is no straight forward way to get the Menu back. I tried F10, Alt etc etc and nothing worked. So, I am sharing the trick which worked for me in this post.

It is simple. Close the Sublime Text 3, if it is open. Open

~/.config/sublime-text-3/Local/Session.sublime_session
in any of your favorite editors and then make sure that, "menu_visible" is "true" in all places in that file.
"menu_visible": true,
Thats it :) Open Sublime Text 3 now and ta-da... Menu is back :)


Edit On Jan 10 - 2016

As I was doing the same task more often, I decided that put that in a script, like this

export FILE=/home/thefourtheye/.config/sublime-text-3/Local/Session.sublime_session
export TEMP_FILE=/home/thefourtheye/.config/sublime-text-3/Local/Session.sublime_session.bkp
sed -e 's/"menu_visible": false/"menu_visible": true/g' $FILE > $TEMP_FILE
mv $TEMP_FILE FILE
and then I added that to my shell script's rc file as an alias like this
alias sublime_fix_menu=~/.sublime_fix_menu.zsh
That's it :-) Now, I just have to close Sublime Text 3, type sublime_fix_menu in the shell, open Sublime again :-)

Sunday, November 17, 2013

Python Dictionary Comprehension

Dictionary comprehensions were backported from Python 3.x to 2.7. I always have believed that they are very pythonic and functional way of programming. Whenever comprehension is used, mutation of mutable elements (set, dict, list etc) becomes unnecessary and that definitely improves the performance as well. Lets start with a simple dictionary comprehension

>>> myMatrix = [[1, 100], [2, 200], [3, 300]]
>>> {key:value for key, value in myMatrix}
{1: 100, 2: 200, 3: 300}

Here we use unpacking from myMatrix list and we have used {} with key:value notation. This way, we can easily convert a list of lists to a dictionary with dictionary comprehension. Lets look at a complicated example

>>> myMatrix = [[100, 100], [20, 200], [30, 300]]
>>> {(key + 100 if key < 100 else key):(value/10 if value >= 200 else value/5) for key, value in myMatrix}
{120: 20, 130: 30, 100: 20}

Here we use conditional expressions to dynamically decide what the key and the value are going to be.

Performance

>>> def changeDict():
...     newDict = {}
...     for key, value in myMatrix:
...         newDict[(key + 100 if key < 100 else key)] = value/10 if value >= 200 else value/5
...     return newDict
...     
>>> from timeit import timeit
>>> timeit("{(key + 100 if key < 100 else key):(value/10 if value >= 200 else value/5) for key, value in myMatrix}", setup="from __main__ import myMatrix")
0.7076609134674072
>>> timeit("changeDict()", setup="from __main__ import myMatrix, changeDict")
0.7484149932861328

The use of comprehension is slightly faster than the function which adds keys and values to an existing dictionary. This difference will be significant when the myMatrix has huge amount of data.

Sunday, October 27, 2013

Zen of Python by Tim Peters

Python has an Easter Egg :) just try to import this like this
import this
you ll get this
The Zen of Python, by Tim Peters

Beautiful is better than ugly.
Explicit is better than implicit.
Simple is better than complex.
Complex is better than complicated.
Flat is better than nested.
Sparse is better than dense.
Readability counts.
Special cases aren't special enough to break the rules.
Although practicality beats purity.
Errors should never pass silently.
Unless explicitly silenced.
In the face of ambiguity, refuse the temptation to guess.
There should be one-- and preferably only one --obvious way to do it.
Although that way may not be obvious at first unless you're Dutch.
Now is better than never.
Although never is often better than *right* now.
If the implementation is hard to explain, it's a bad idea.
If the implementation is easy to explain, it may be a good idea.
Namespaces are one honking great idea -- let's do more of those!

File Upload with jQuery and Ajax

The requirement is simple. I should be able to upload files to the server with jQuery and ajax. Lets get started.
<html>
   <form>
     File Description:<input type="text" id="desc" />
     Choose File:<input type="file" id="chosenFile" />
     <input type="button" id="submitFile" value="submitTheFile" />
   </form>
</html>
Now, the real jQuery stuff
<script type="text/javascript">
    jQuery.noConflict();
    jQuery(document).ready(function() {
        jQuery("#submitFile").click(function() {
            jQuery.ajax({
                url: "[url to be submitted to]",
                type: "POST",
                contentType: false,
                processData: false,
                data: function() {
                    var data = new FormData();
                    data.append("fileDescription", jQuery("#desc").val());
                    data.append("chosenFile", jQuery("#chosenFile").get(0).files[0]);
                    return data;
                    // Or simply return new FormData(jQuery("form")[0]);
                }(),
                error: function(_, textStatus, errorThrown) {
                    alert("Error");
                    console.log(textStatus, errorThrown);
                },
                success: function(response, textStatus) {
                    alert("Success");
                    console.log(response, textStatus);
                }
            });
        });
    });
<script>
Important things to be noted here are
contentType: false,
                processData: false,

contentType will be determined automatically, so we don't have to set that explicitly and processData has to be false, otherwise the data will be processed and transformed into a query string, fitting to the default content-type "application/x-www-form-urlencoded". Next important thing is

data: function() {
                    var data = new FormData();
                    data.append("fileDescription", jQuery("#desc").val());
                    data.append("chosenFile", jQuery("#chosenFile").get(0).files[0]);
                    return data;
                    // Or simply return new FormData(jQuery("form")[0]);
                }(),
You can read about FormData here. We basically set the values being submitted. The first parameter is the key and the second parameter is the actual value to be passed. We can get the value of any form field with
jQuery("#desc").val()
expect the files. If we use the same for files, we ll get just the file name instead of the file contents. So, we have to do something like
jQuery("#chosenFile").get(0).files[0]
If we dont want to set individual values and want to pass all the fields in the form, we can simply do
data: new FormData(jQuery("form")[0])
Thats it. Enjoy Ajaxified file upload :)
References:

Saturday, September 7, 2013

Installing the thefourtheyeEditor - topcoder plugin

thefourtheyeEditor is a very lightweight plugin for Topcoder Arena to participate in Single Round Matches, which can build testcases and lets the users to store the solutions as local files, so that any editor or IDE can be used to edit them. It also maintains the solutions in the directories named as the SRM's display name.

Features

  1. Very lightweight - Only one jar file. It doesn't depend on any other external jar files.
  2. Organized solutions storage - Solutions will be stored as per the SRM names
  3. File based configuration - Configurations are done in contestapplet.conf file. No need to use UI.

Installation

  1. Download thefourtheyeEditor plugin (thefourtheyeEditor.jar) from https://github.com/thefourtheye/thefourtheyeEditor/releases/download/latest/thefourtheyeEditor.jar
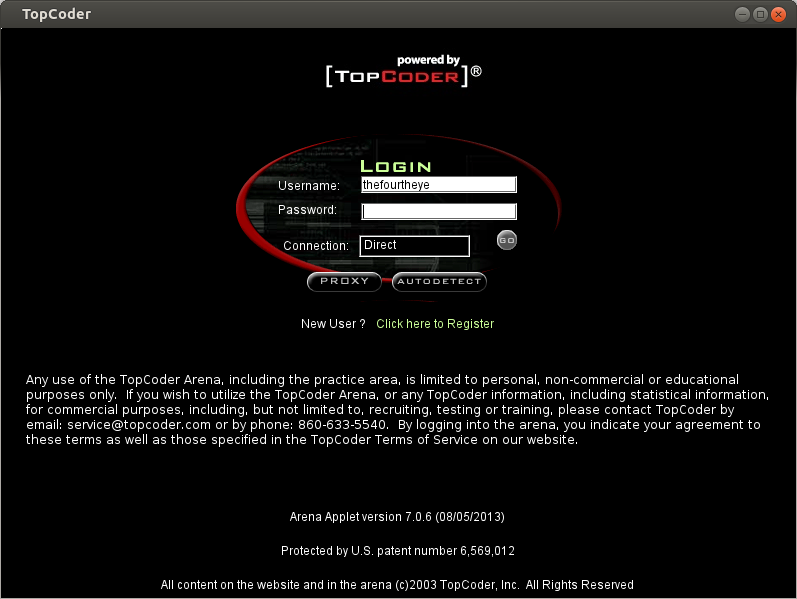
  2. Open topcoder contest applet and login with your username and password

  3. Select Editor from the Options menu. You 'll see something like this

  4. Click on Add and you 'll get a window like this. Fill in the details as you see in this picture. Actually you can give any name in the Namefield and in ClassPath field, you have to locate the thefourtheyeEditor.jar file using Browse button. EntryPoint must be exactly the same as thefourtheyeEditor.Main.

  5. Once these steps are done, the Editor preferences page will look like this

  6. Click on Save button and close that window. That's it. Installation is complete :)

Wednesday, September 4, 2013

Ubuntu bug related to network and power

Last week, I faced this weird problem. When my laptop is not connected to a power source (not on battery), I could not connect to LAN network with my LAN cable, but Wi-Fi worked fine. I struggled a lot for a week and then I found a solution in the internet.

All you have to do is to execute this one liner in your terminal.

echo on > /sys/class/net/eth1/device/power/control
Here eth1 corresponds to my second ethernet interface. It might vary from machine to machine. And if the directories eth, device and power dont exist, you might have to manually create them.

Monday, July 29, 2013

Compiling Node.js scripts in Windows 7 with Sublime Text 3

This is a continuation of Compiling CPP 11 Programs with Sublime Text 3 in Ubuntu where we saw how to configure Sublime Text 3 in Ubuntu 13.04 to compile C++ 11 programs. In this post, we ll see how to execute Node.js programs in Windows 7 machine's Sublime Text 3. I am going to assume that Node.js is installed properly and PATH variable is also set properly. If you are using Windows Installer, we dont have to worry about this.

  1. We need to create the following directory structure in the User's home directory AppData\Roaming\Sublime Text 3\Packages\JS\. In my machine, home directory is C:\Users\[username]. To know the current user's home directory, open Cmd.exe and type echo %userprofile%.
  2. In that directory, create a file called "JS.sublime-build". So, the location of the file from the home directory is AppData\Roaming\Sublime Text 3\Packages\JS\JS.sublime-build You can name the sublime-build file as anything you want. I have simply named it here as JS.
  3. Copy and paste the following text in to it.
    {
     "cmd": ["node.exe", "${file}"],
     "file_regex": "^(..[^:]*):([0-9]+):?([0-9]+)?:? (.*)$",
     "working_dir": "${file_path}",
     "selector": "source.js",
     "variants":
     [
      {
       "name": "Run",
       "cmd":["node.exe", "${file}"]
      }
     ]
    }
    
  4. Thats it. Open Sublime Text 3. Click on Tools->Build System. You should see JS as one of the options. From now on, you can execute node.js scripts simply by pressing Ctrl-B.

Sunday, July 21, 2013

Compiling C++11 Programs with Sublime Text 3

For Windows 7, you may want to read this post http://www.thefourtheye.in/2013/07/Compiling-Node.js-scripts-in-Windows-7-with-Sublime-Text-3.html

Today I installed Sublime Text 3's public beta on my Ubuntu 13 and the first thing I noticed is, the inability to compile C++ 11 programs. The obvious problem is, it was missing -std=c++0x parameter to g++. I tried to figure out how to edit the build parameters of Sublime. After an hour's struggle managed to figure out.

  1. You need to create the following file ~/.config/sublime-text-3/Packages/C++/C++.sublime-build. The ~ refers to the home directory of the current user.
  2. Now insert the below seen text to that file
    {
     "cmd": ["g++", "-std=c++0x", "${file}", "-o", "${file_path}/${file_base_name}"],
     "file_regex": "^(..[^:]*):([0-9]+):?([0-9]+)?:? (.*)$",
     "working_dir": "${file_path}",
     "selector": "source.c, source.c++",
     "variants":
     [
       {
         "name": "Run",
         "cmd":["bash", "-c", "g++ -std=c++0x '${file}' -o '${file_path}/${file_base_name}' && '${file_path}/${file_base_name}'"]
       }
     ]
    }
    
  3. Save this file and close it. Sublime will pick up the changes immediately.
This will take care of compiling C++ 11 programs.

Sunday, June 30, 2013

SPOJ Best Solutions for The Double Helix

Unforgettable day. Got my solution featured, as one of the best Python solutions to "The Double Helix" problem.

Saturday, June 15, 2013

Project Euler - 15 - Lattice paths

In this post we are dealing with Project Euler - 15 - Lattice paths. This is one of the simple dynamic programming problems. We have to find the number of paths to reach the bottom right from the top left, moving only downwards and right sidewards. It was not so easy for me to see the solution even for the sample data given. It would be easy when we look from the bottom-left. For the sample 2x2 grid, lets say the bottom-left (2, 2) point has 0 path and 1,2 and 2,1 have 1 path each. It is evident that number of paths to reach (2, 2) from all the points on the bottom most row (0, 2), (1, 2) and the right most column (2, 0), (2, 1), as we cannot move upwards and left sidewards. Now, (1, 1) has two paths to reach (2, 2), either through (1, 2) or (2, 1). So it has the value 2. Same way, (0, 1) and (1, 0) have 3 ways ( (0, 1) can take (1, 1) (which has 2 paths to (2, 2) ) and (0, 2) (which has 1 path to (2, 2) ). So, (0, 0) has 6 paths to (2, 2) either via (0, 1) or via (1, 0). Applied this idea as a dynamic programming program and it solved this problem.
Total = 21

Array = [[0]*Total for i in xrange(Total)]
for i in xrange(Total): Array[i][Total - 1], Array[Total - 1][i] = 1, 1   #Initializing bottom row and right column with 1

def Rec(i, j):
    global Array
    if Array[i][j]: return Array[i][j]
    Rec(i+1, j)
    Rec(i, j+1)
    Array[i][j] = Array[i+1][j] + Array[i][j+1]

Rec (0, 0)
print Array[0][0]

Project Euler - 14 - Longest Collatz sequence - memoization

This post is about the Project Euler - 14 - Longest Collatz sequence problem. This is one of the perfect examples of memoization technique. This is the actual problem.

The following iterative sequence is defined for the set of positive integers:

n → n/2 (n is even)
n → 3n + 1 (n is odd)

Using the rule above and starting with 13, we generate the following sequence:
13 → 40 → 20 → 10 → 5 → 16 → 8 → 4 → 2 → 1

It can be seen that this sequence (starting at 13 and finishing at 1) contains 10 terms. Although it has not been proved yet (Collatz Problem), it is thought that all starting numbers finish at 1.

Which starting number, under one million, produces the longest chain?

NOTE: Once the chain starts the terms are allowed to go above one million.

Simple Solution


The problem statement looks pretty simple and a brute force will work just fine. This code runs in 20 seconds.

def Series(N):
    Counter = 1
    while N != 1:
        N = N/2 if N % 2 == 0 else 3*N+1
        Counter += 1
    return Counter

Max, Element = 0, 0
for x in xrange (1, 1000000):
    series = Series(x)
    if (Max < series):
        Max = series
        Element = x

print Max, Element


As I had to wait for 20 seconds to get the solution, I was thinking about improving the performance. Then I found this. From the problem statement, 13 → 40 → 20 → 10 → 5 → 16 → 8 → 4 → 2 → 1, starting with any number, if it becomes 13 at any point of time, it has to take the same route and if it becomes 13 it will take 10 steps to become 1. So I wanted to store this information first time itself, so that I don't have to recalculate. This is called Memoization. Quoting from wikipedia

In computing, memoization is an optimization technique used primarily to speed up computer programs by having function calls avoid repeating the calculation of results for previously processed inputs

Optimized (Memoized) Solution


To optimize it, I just had to change the Series function alone. I stored the computed values in a dictionary and if the current number in the sequence happens to be in the dictionary, I ll just return the value corresponding to it. This program responded with the result in 2 seconds. That is 10 times faster than the first version.

Dict = {}

def Series(N):
    Counter = 1   #It is 1, because we are counting the initial N
    Original = N
    while N != 1:
        N = N/2 if N % 2 == 0 else 3*N+1
        if N in Dict:                    # Check if the length has been computed for this number already
            Counter += Dict[N]           # Add it to the current length counter
            Dict [Original] = Counter    # Store the computed value for future look back
            return Counter
        Counter += 1
    Dict [Original] = Counter            # Store the computed value for future look back
    return Counter